
struts2介绍
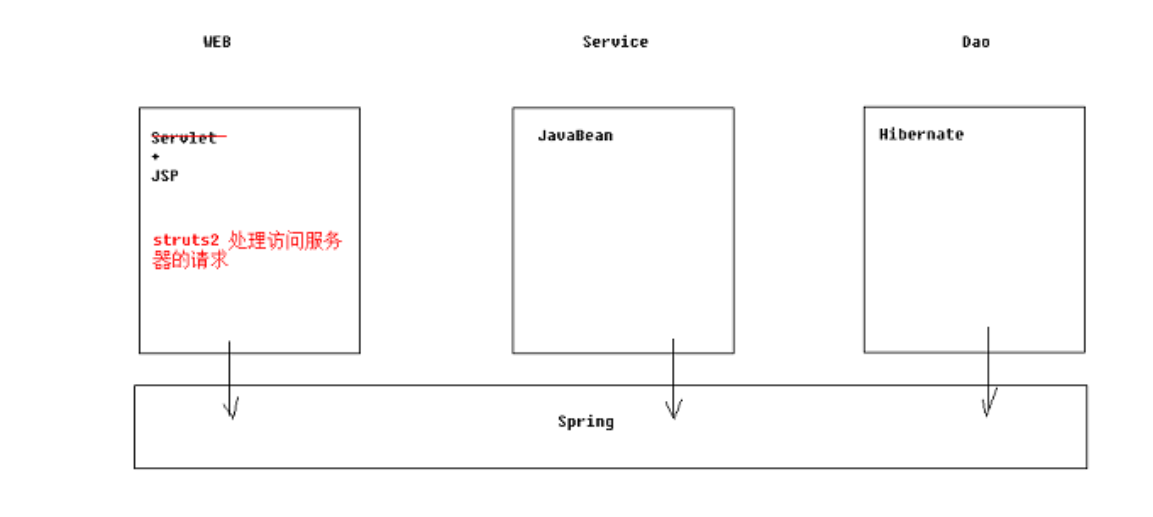
Struts2是一种基于MVC模式的轻量级web框架。它本质上相当于一个servlet,在MVC设计模式中,Struts2作为控制器(controller)来建立模型与视图的数据交互。
优势
- 自动封装参数
- 参数校验
- 结果的处理(转发、重定向)
- 国际化
- 显示等待界面
- 防止表单的重复提交
Struts2具有更加先进的架构以及思想
servlet是线程不安全的?
struts2的前身是workweb
创建项目
解压struts2的开发包
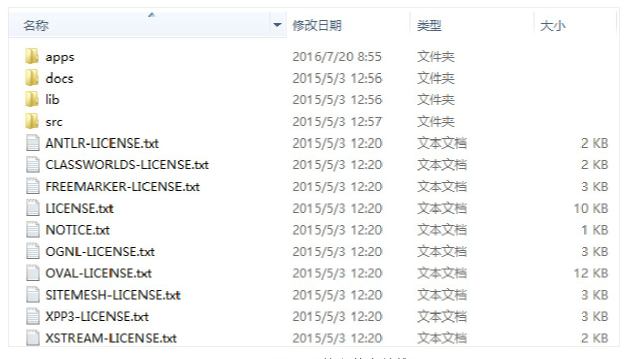
apps:官方提供的示例程序,各实例是war包,可以通过zip方式进行解压
docs:官方提供的文档
lib:struts2的核心类库,以及第三方插件类库
src:框架对应的源码
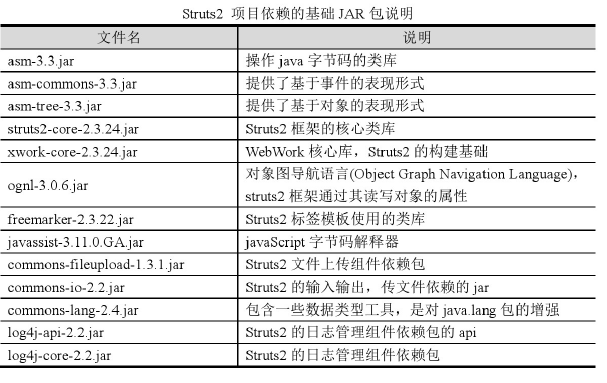
1. 导入基本开发包
idea创建struts2项目参考博客
2. Action类:
public class HelloAction {
    public String hello(){
        System.out.println("hello world");
        return "success";
    }

}
3.配置struts.xml文件
<?xml version="1.0" encoding="UTF-8"?>
<!DOCTYPE struts PUBLIC
        "-//Apache Software Foundation//DTD Struts Configuration 2.5//EN"
        "http://struts.apache.org/dtds/struts-2.5.dtd">

<struts>
    <package name="hello" namespace="/hello" extends="struts-default">
        <action name="HelloAction" class="com.struts2.action.HelloAction" method="hello">
            <result name="success">/hello.jsp</result>
        </action>
    </package>
</struts>
4.将struts2核心过滤器配置到web.xml
<filter>
        <filter-name>struts2</filter-name>
        <filter-class>org.apache.struts2.dispatcher.ng.filter.StrutsPrepareAndExecuteFilter</filter-class>
    </filter>
    <filter-mapping>
        <filter-name>struts2</filter-name>
        <url-pattern>/*</url-pattern>
    </filter-mapping>
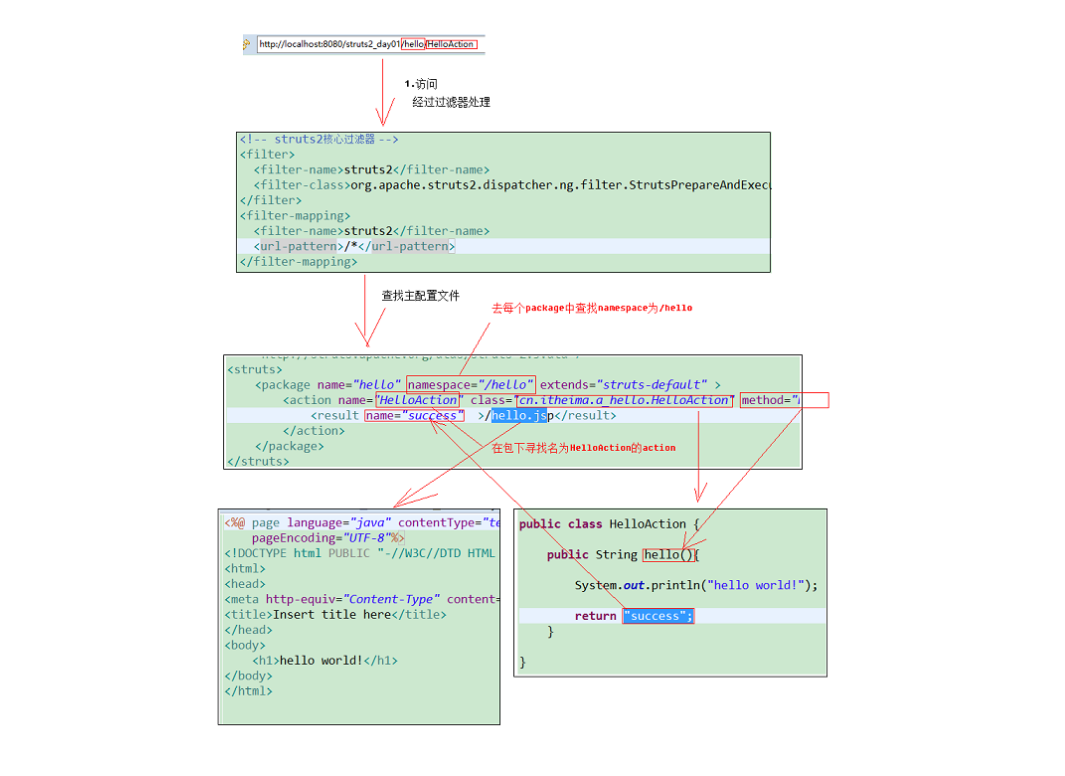
5.测试
访问路径:http://localhost:8080/hello/HelloAction
Struts2访问流程
Struts2架构
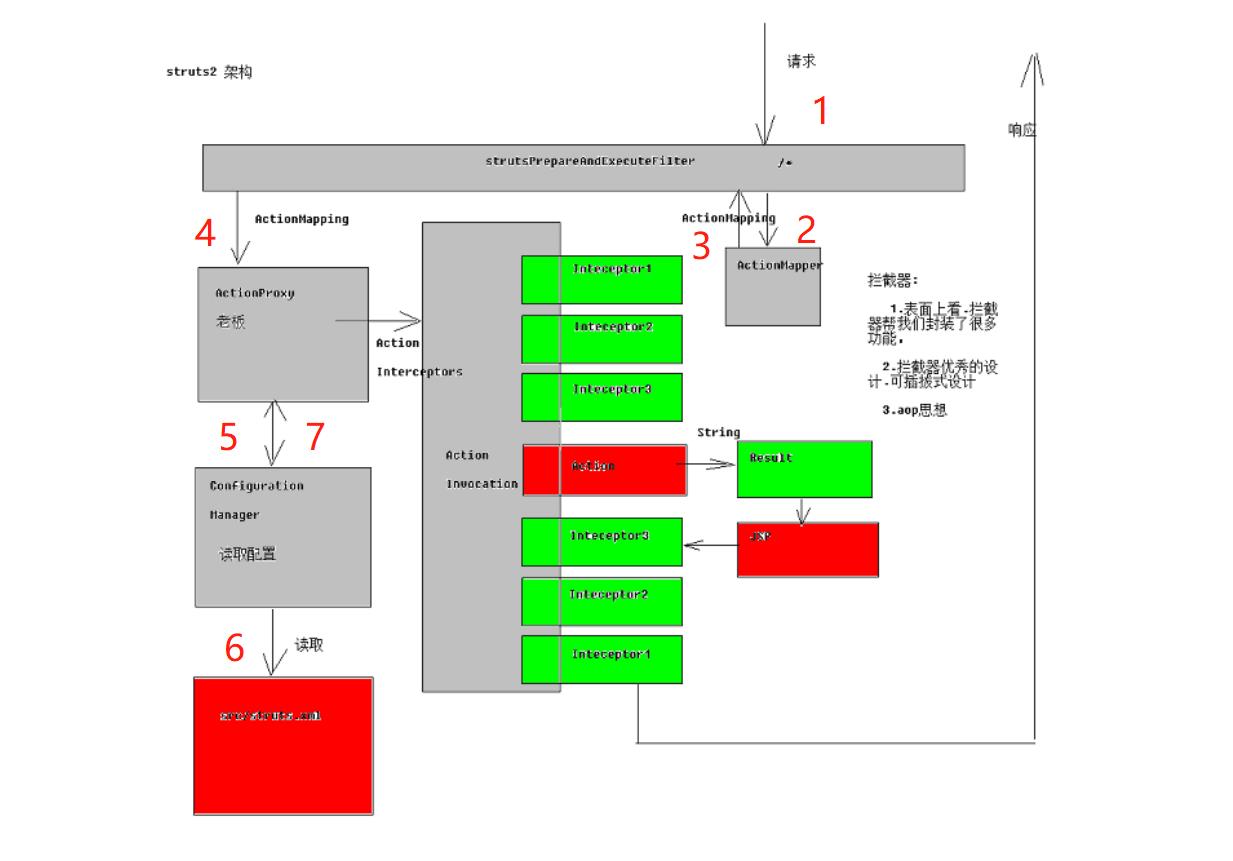
AOP:面向切面编程.将纵向重复代码,横向抽取。拦截器、filter
Filter:
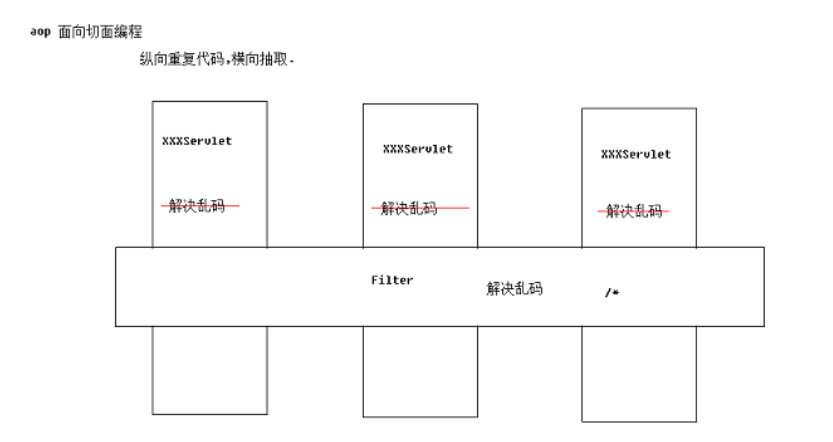
拦截器:

配置详解
<struts>
  <!--
 package:将Action配置封装,就是可以在package中配置很多action
	name属性:给包起个名字,具有标识作用,不能与其他包名重复
	namespace属性:给action访问路径中定义一个命名空间	extends属性:继承一个指定的包。	一般为struts-default
	abstract属性:包是否为抽象;标识属性,标识此包不能独立运行,专门提供继承
  -->
    <package name="hello" namespace="/hello" extends="struts-default">
      <!--
		action元素:配置action类
			name属性:决定了action的访问名称
			class属性:action类的完整类名,默认值ActionSupport
			method属性:指定action类中的方法处理请求,默认值execute
	  -->
        <action name="HelloAction" class="com.struts2.action.HelloAction" method="hello">
          <!--
 			result元素:配置结果
 				name:标识处理结果的名称,与action方法的返回值对应
				type属性:指定调用哪个result类来处理结果,默认使用转发
		  -->
            <result name="success">/hello.jsp</result>
        </action>
    </package>
</struts>
常量配置
<include>标签可以引入其他的配置文件
default.properties
配置文件的加载顺序:
- default.properties
- struts.xml(常用)
- web.xml
- 国际化配置struts.xml:
- 解决post提交乱码
<constant name="struts.i18n.encoding" value="UTF-8"></constant>
-
struts的action的访问后缀名
<constant name="struts.action.extension" value="action,,"></constant> //http://localhost:8080/hello/HelloAction————,,标识空后缀 //http://localhost:8080/hello/HelloAction.action -
struts是否以开发模式进行
<constant name="struts.devMode" value="true"></constant>
<!--开发时设置为true
 主配置不需要重启就可以重新加载(热加载)
 可以显示丰富的错误信息输出,方便开发调试
-->
动态方法调用
action类:
public class HelloAction {
    public String hello(){
        System.out.println("hello world");
        return "success";
    }

    public void add(){

    }
    public void del(){

    }
    public void update(){

    }
    public void find(){

    }
    }
方式一:
http://localhost:8080/hello/HelloAction!add
<!--动态方法配置常量-->
    <constant name="struts.enable.DynamicMethodInvocation" value="true"></constant>
    <package name="hello" namespace="/hello" extends="struts-default">
        <action name="HelloAction" class="com.struts2.action.HelloAction">
            <result name="success">/hello.jsp</result>
        </action>
    </package>
方式2:通配符
{1}——取出第一个*的值
访问路径:http://localhost:8080/hello/HelloAction_add
<package name="hello" namespace="/hello" extends="struts-default">
        <action name="HelloAction_*" class="com.struts2.action.HelloAction" method="{1}">
            <result name="success">/hello.jsp</result>
        </action>
    </package>
Action类详解
方式一:创建一个类,可以是POJO,不用继承任何父类也不用实现任何接口。
方式二;实现一个接口Action,实现execute方法,提供action方法的规范;提供了一些预置字符串,可以在返回结果时使用,为了方便
方式三:继承ActioinSupport类,实现了一些接口如:Validateable、VaildationAware、TextProvider、LocalProvider等
结果跳转
<result-types>
    <result-type name="chain" class="com.opensymphony.xwork2.ActionChainResult"/>
    <result-type name="dispatcher" class="org.apache.struts2.dispatcher.ServletDispatcherResult" default="true"/>
    <result-type name="freemarker" class="org.apache.struts2.views.freemarker.FreemarkerResult"/>
    <result-type name="httpheader" class="org.apache.struts2.dispatcher.HttpHeaderResult"/>
    <result-type name="redirect" class="org.apache.struts2.dispatcher.ServletRedirectResult"/>
    <result-type name="redirectAction" class="org.apache.struts2.dispatcher.ServletActionRedirectResult"/>
    <result-type name="stream" class="org.apache.struts2.dispatcher.StreamResult"/>
    <result-type name="velocity" class="org.apache.struts2.dispatcher.VelocityResult"/>
    <result-type name="xslt" class="org.apache.struts2.views.xslt.XSLTResult"/>
    <result-type name="plainText" class="org.apache.struts2.dispatcher.PlainTextResult" />
    <result-type name="postback" class="org.apache.struts2.dispatcher.PostbackResult" />
</result-types>
<!--  转发 -->
<action name="Demo1Action" class="cn.itheima.a_result.Demo1Action" method="execute" >
		<result name="success" type="dispatcher" >/hello.jsp</result>
	</action>
<!-- 重定向 -->
	<action name="Demo2Action" class="cn.itheima.a_result.Demo2Action" method="execute" >
		<result name="success" type="redirect" >/hello.jsp</result>
	</action>
<!-- 转发到Action -->
	<action name="Demo3Action" class="cn.itheima.a_result.Demo3Action" method="execute" >
		 <result name="success" type="chain">
		 		<!-- action的名字 -->
             <param name="actionName">Demo1Action</param>
             	<!-- action所在的命名空间 -->
             <param name="namespace">/</param>
         </result>
	</action>
	<!-- 重定向到Action -->
	<action name="Demo4Action" class="cn.itheima.a_result.Demo4Action" method="execute" >
		<result  name="success"  type="redirectAction">
			 <!-- action的名字 -->
             <param name="actionName">Demo1Action</param>
             <!-- action所在的命名空间 -->
             <param name="namespace">/</param>
        </result>
	</action>
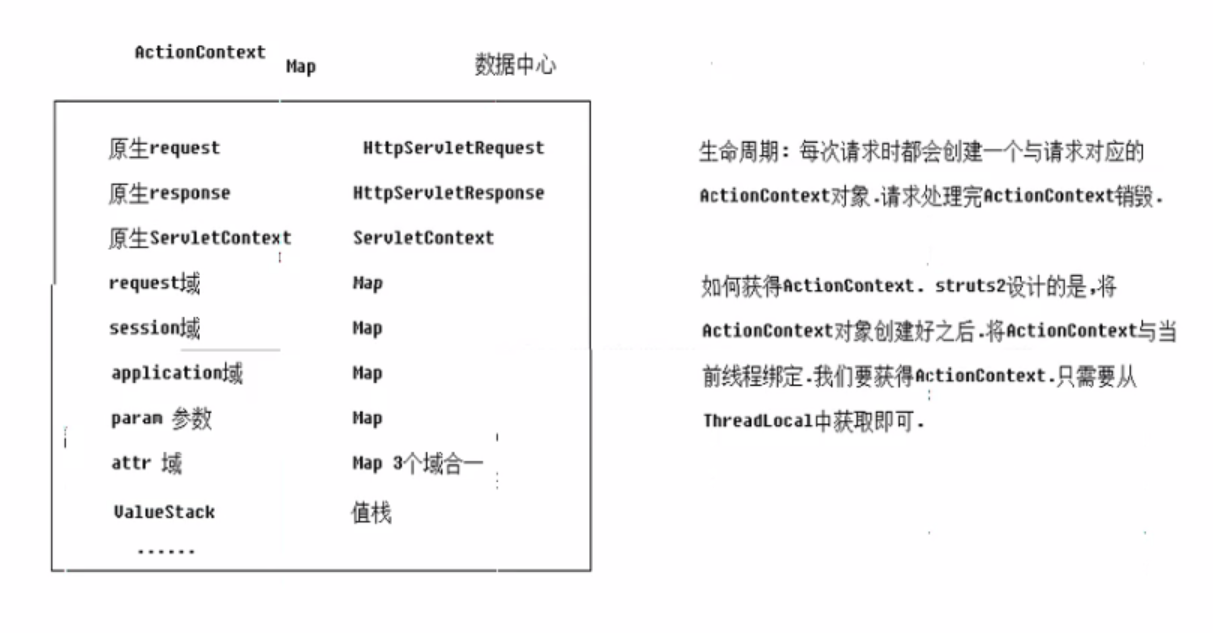
获得servletAPI
-
通过ActionContext对象获得
public String execute() throws Exception { Map<String, Object> session = ActionContext.getContext().getSession(); //aplication域 Map<String, Object> application = ActionContext.getContext().getApplication(); //request域——》不推荐使用原声request域,推荐将ActionContext作为request使用 Map<String, Object> request = (Map<String, Object>) ActionContext.getContext().get("request"); ActionContext.getContext().put("name","hha"); return SUCCESS; } -
通过ServletActionSupport获得(不推荐)
public void demo2(){ ServletActionContext.getRequest(); } -
实现接口
ServletRequestAware……等接口
数据封装
set方法
//form表单
<TR>
								<td>客户名称:</td>
								<td>
								<INPUT class=textbox id=sChannel2
														style="WIDTH: 180px" maxLength=50 name="custName">
								</td>
								<td>客户级别 :</td>
								<td>
								<INPUT class=textbox id=sChannel2
														style="WIDTH: 180px" maxLength=50 name="custLevel">
								</td>
							</TR>

							<TR>

								<td>信息来源 :</td>
								<td>
								<INPUT class=textbox id=sChademo6nnel2
														style="WIDTH: 180px" maxLength=50 name="custSource">
								</td>
								<td>联系人:</td>
								<td>
								<INPUT class=textbox id=sChannel2
														style="WIDTH: 180px" maxLength=50 name="custLinkman">
								</td>
							</TR>
Action页面:
private long custId;
    private String custName;
    private Long custUserId;
    private Long custCreateId;
    private String custPhone;
    private String custMobile;

    @Override
    public String execute() throws Exception {

        CstCustomerEntity cstCustomerEntity=new CstCustomerEntity();
        cstCustomerEntity.setCustName(this.custName);
        cstCustomerEntity.setCustPhone(this.custPhone);
        ActionContext.getContext().put("cst",cstCustomerEntity);
        return SUCCESS;
    }

    public long getCustId() {
        return custId;
    }

    public void setCustId(long custId) {
        this.custId = custId;
    }

    public String getCustName() {
        return custName;
    }

    public void setCustName(String custName) {
        this.custName = custName;
    }
    public String getCustPhone() {
        return custPhone;
    }

    public void setCustPhone(String custPhone) {
        this.custPhone = custPhone;
    }